If you are doing a manual process, set up your Plugnotes account to automatize it for you!
A trigger will allow you to automate an action (process) following the occurrence of a condition (event);
- The condition is only examined in Plugnotes that have just been created or modified within the last few minutes (maximum 5 minutes) and in this case, only the action planned in the trigger will be executed;
- To access the triggers tool, you must find in the list of your Plugforms the XX15 Triggers Plugform which will have been added by the sales department;
- You must create a Plugnote per trigger.
Example of a trigger
As soon as field 14 of the Plugnotes of the Plugform 1-A032 contains the mentioned PLM ( = condition), the trigger will launch an action (08 copy (S03)) S03 located in the 12th column of each row of the table located at field 7.
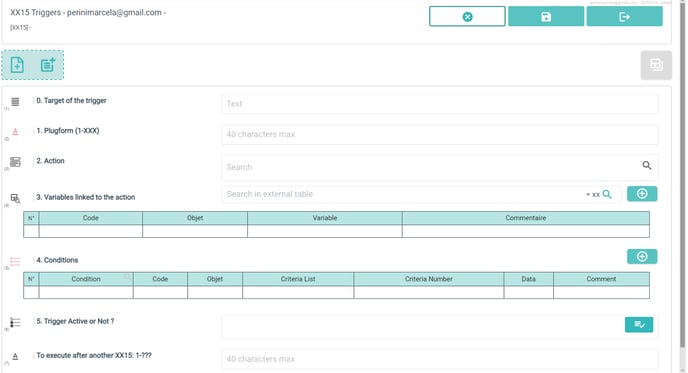
Below we will explain the content of each field of the Plugnotes of this trigger:

- Allows you to summarize the action of the trigger for information purposes.

- Must contain the Plugform in which the condition will be checked.

- You must choose and select ONE of the available trigger actions via the magnifying glass.


- A new pop-up with the variables will appear, and you will need to follow these 03 following rules:

Rule 2: In level 1, you must choose between the 2 possibilities S03-1A and S03-1B:

Rule 3: In the example we chose the possibility S03-1B and therefore we had to select the 3 lines of option B: S03-1B1, S03-1B2, S03-1B3:

After the import of the right rows in the table, you have to fill in the column "Variable":
-png.png?width=688&height=182&name=image%20(2)-png.png)

- Allows you to choose the conditions for your trigger.
It is possible to insert several conditions one after the other in the table and in this case, the conditions will necessarily be cumulative.
Click on the table and in the magnifying eye to select the right rows.
A condition could be applied to a Plugnote (2-PN), a field (3-FD), or finally a table field (4-TB):
You must select all and only the rows of the type on which the condition will be applied.
After importing the rows linked to the selected type into the table, you must complete the last three columns:
Column 5 - Criteria Number: Make the selection of one of the criteria listed in the imported column (Column 4) (Criteria List) by mentioning the number relating to it.
Rule X: For 3-FDxx you must choose a criterion that only begins with the number of the type 3-FD02 (1-2-3).
Column 6 - Data: You must (often) add the data to which the criterion will apply.
Column 7 - Comment: This is optional but can be used to describe the condition in words to facilitate later reading of the Plugnote.
- Define the status of your trigger. To temporarily deactivate a trigger, you must set its status to 2- Not Active. 3- Test status simply indicates that it is not yet validated but is already Active.
- Allows you to associate several actions by associating different triggers one after the other. From the second trigger, you must mention the Plugnote number (XX15) of the previous trigger.
--
Customer Success
If you have any questions, please contact our Customer Success Team